I've never been on a photowalk before. How do I prepare?
This great question was recently raised on the Photowalking Utah discussion forum. I figured I could do a quick Google search and point the questioner to a couple answers. Surprisingly, I didn't find any, so here are some of my thoughts on the subject.
First, unless you know how to take photos without a camera, you will need one. This can be anything you want to use. Bring something you're comfortable with or want to learn to use better. Photowalks are not intended to be gear competitions. I've seen everything from cell phone cameras to five figure DSLR rigs to medium format film cameras used. There is no disgrace in having a point and shoot and there's no superiority in bringing the most expensive thing on the market. The goal is to have fun and learn to use what you have better.
Most cameras these days have batteries. Make sure they're charged. A backup would be a good idea. And don't forget to top off the batteries in accessories too.
There aren't many things more frustrating than getting the blinking "CF full" message in your viewfinder. Make sure you have enough space in your memory cards. Carry extra; better more than you need than not enough. Of course if you shoot film, memory cards won't do you much good; just have enough film for the trip.
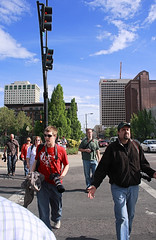
Photowalking is a compound word. You need to take photos and you need to walk. A good pair of shoes appropriate for the location allows you to focus on shooting. The wrong pair will be a distraction. Make sure you fall in the first category. Some walking/sport shoes in an urban setting are probably a good choice. On the other hand, in a rocky environment some hiking boots might be better. I really appreciated the organizers of a recent photowalk letting us know there were some marshy areas around where we were going so I could bring some footwear appropriate for that environment.
Dress appropriately for the weather and check the forecast just before you leave. If there's going to be a wide swing in temperatures, use multiple light layers to add or remove insulation as needed. If there's going to be precipitation, don't not go. Rather take protection and have fun with the reflections and moody environment. Things look completely different in the rain. You might want to have a change of clothes in the car though so you don't have to drive home soggy.
Take care of your body. Walking is exercise and staying hydrated is important. Particularly outdoors during summer, make sure you have some sort of liquid available. This may be having some cash to pop into a local market to buy it on the fly if you're in town or carrying a bottle of water or canteen if you're out in the rough. In any case, make sure you know your limits and the environment and plan accordingly.
Know where and when the photowalk starts. Everyone misses out if the group leaves without you. You lose the synergy generated by the group and the group misses your input. There are several web sites that give time and distance between two points. (Here's one and here's another.) You enter your address and the address of the photowalk's start and you get back directions with estimated average driving time; adjust for weather and local road conditions. And then leave 10 minutes early.
The items above are the most important things to consider. If you want to go light, that's about it. Now let's cover some optional items.
First, taking optional items will probably require something to carry them. Depending on your load, a backpack, camera bag or large pockets will be suffice.
A hard-drive based media viewer is a really useful tool. My work flow is to start with two empty CF cards and the viewer (also typically empty). When I fill a card, I swap CF cards in the camera. I then put the full one in the viewer and start the backup. I can then continue shooting. When the backup is finished, I clear that card and have it ready for when the second card is filled. Repeat as needed. When I'm done with the photowalk it all gets downloaded to the computer and cleared from the portable devices.
Depending on the location, sometimes a tripod is useful. I've been on some photowalks where I've used it quite a bit. I've been on others where I haven't used it at all. Others fall in between. Sometimes I've not used it and should have. It all depends on personal style and the types of shots you're taking. I tend to err on the side of over planning and typically take it.
Lastly, consider the location and plan for possible needed accessories. If you're going to someplace during the day with lots of reflections, for example a car show or a lake or a river, a circular polarizer filter will help you cut out some of those reflections. If you're going to be catching a sunrise or sunset, some people like a graduated neutral density filter. A standard neutral density filter can give you interesting effects by blurring movement in bright light. Even during daylight, I always carry a flash and radio remotes, with charged batteries. You never know when a fill light will be just what you want.
In closing, mentally plan your trip. Think about the location and environment and the types of shots you want to get. Consider a new technique you've been wanting to try but haven't and plan to use it. I know people with very extensive DSLR setups who have attended with simple point and shoot cameras to limit their equipment options and focus on composition. Other's have attended with a new piece of equipment specifically to experiment with them. Some who are comfortable in the automatic modes on their camera, use the expertise of others on the walk to get more comfortable with aperture priority or manual modes. Finally, plan enough to get out there and have fun, but not so much that you lose spontaneity.
If anyone has any other ideas, feel free to share them in the comments.
Monday, June 23, 2008
How to prepare for a photowalk
Labels:
HowTo,
Photography,
Photowalking
![]()
![]()
Monday, May 19, 2008
How to fake a miniature in Corel's Paint Shop Pro Photo XI
I first saw fake miniatures (aka tilt-shift effect) on my friend Rich Legg's blog last year. Since then I've had it in the back of my mind to try it out. At a recent Photowalking Utah event I saw the perfect shot and took it. (Apparently I wasn't alone in my assessment.)
When I finally got around to doing the post-processing, I couldn't find a good, complete tutorial for Paint Shop Pro XI, so I decided to write up what I did. None of this technique is really original to me, but I did have to do some searching and adapt what I found elsewhere in a couple places. Hopefully, having this consolidated will help someone else.
First, a brief overview. The idea is to trick the brain's perception of the image to think it's looking at something smaller than it actually is. This is done by changing the queues the brain uses to gauge size. To start, this technique works best where the perspective is from above, looking down on the main scene. Secondly, we emulate a narrow depth of field, typical of macro shots. Finally, we boost the color saturation and decrease some detail, typical of models.
And a couple house keeping notes:
- Click on any image to see a larger view.
- The specific adjustment values given in this tutorial work well for this image. They may need to be adjusted for differently sized or exposed images.
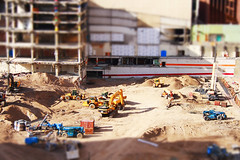
We'll start with this original.
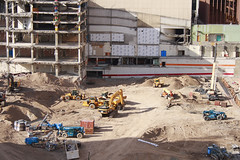
As already stated, we want something where we're looking down on a scene that's fairly well exposed. This was taken from the 12th level of a parking structure looking down on a large construction project.
The first adjustment will be to make it appear to have a limited depth of field. To do this, select the rectangular selection tool and set the feathering to a large value. For this image, I used 150 pixels.
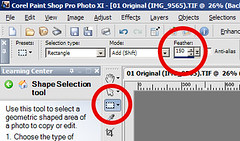
Then select the area of the image that should be in focus plus extra for the feathering. The area needs to be large enough that the feathering does not come into the area that should be sharp.
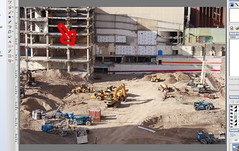
Next invert the selection by pressing Ctrl-Shift-I or selecting Invert from the Selections menu.

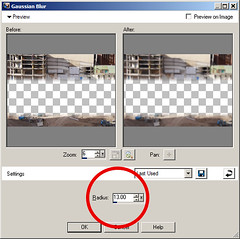
Now we're going to blur the selection by selecting Gaussian Blur from the Adjust menu's Blur options. We want a number large enough to give a good blur but not enough to make all the details go away completely. For this image, I used a radius of 13.

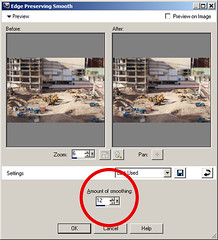
We're done with the selection, so press Ctrl-D or select Select none from the Selections menu. Now select Edge preserving smooth from the Adjust menu's Add/Remove Noise options. The idea here is to get rid of some of the details inside objects without losing the edges. For this image, I used a smoothing about of 12.

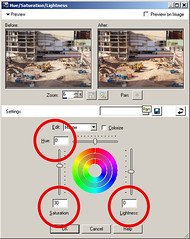
Next we're going to boost the saturation a fair bit. Select Hue/Saturation/Lightness from the Adjust menu's Hue and Saturation options. We don't need to change the Hue or Lightness values, so they can be set to 0. The Saturation value for this image I set to 30.

Finally, we adjust the contrast some by selecting Curves from the Adjust menu's Brightness and Contrast options and set two control points to give a standard contrast increasing S-curve.
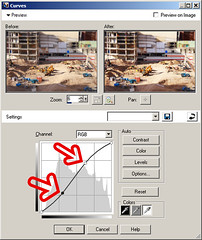
All this results in this final image.
Labels:
HowTo,
PaintShopPro,
PhotoEditing,
Photography,
PostProcessing
![]()
![]()
Saturday, March 10, 2007
How to duplicate the Orton Effect in Paint.Net
I've noticed some buzz on the blogs and photography web sites I visit about the Orton Effect and how to do it in Photoshop. I had close-ups of a couple flowers I wanted to do some special post-processing on and thought this might be an interesting thing to attempt in Paint.Net.
Basically, the idea is to add some blur to the image to give it a soft, dreamy look. The original technique used two over-exposed transparencies sandwiched together. In the digital realm, this is duplicated by layering blurred copies with the original image.
This tutorial is a recipe for what I did. These steps are not original to me; they're simply an adaptation for Paint.Net of what I found on other sites. [1]
Original:
After this tutorial:
To start, right click the image below and select 'Save image as...'. Select somewhere on your computer and save it. Then start Paint.Net and open the file you just saved.
Ok, here we go...
1. Change the name of the layer to make it clear which layer is which. Do this by clicking on the Layer properties button and typing in a new name; something like 'Sharp'.

2. Now duplicate this layer.
3. With the duplicated layer highlighted, click on properties and change the Blending mode to Screen. This has the effect of lightening the image. In the original Orton technique, the sharp image was over exposed one stop. This simulates that effect.
4. Next, with the duplicated layer still highlighted, click the Merge layer down button on the Layers window. This creates a single new layer.
5. Using first step 2 and then step 1, duplicate this layer and name the new layer something like 'Out of focus'. You should now have two layers.
6. Make sure the 'Out of focus' layer is highlighted and on the menu select Effects | Blurs | Unfocus. Up to this point things have been fairly mechanical. Now some subjectivity comes into play. The value to enter here is to a large degree personal preference and specific for a given image's subject and resolution. The idea is to blur out the sharp lines and details but leave the general shape. In general, the higher the resolution of the image, the more unfocusing is needed. For this image, I used a value of 100.
7. Now comes the interesting part. Click on the Out of focus layer's properties and set the Blending mode to Multiply. This blends the two images such that the overall exposure is made similar to the original, brings back the detail but leaves some nice soft edges.
We've now arrived at the final result of applying this method.
(Click image to see a larger size.)
If you're pleased with the result, you can merge the two layers and save your image. If you want more or less blurring, you can go back to step 6 in the history and change the Radius on the Unfocus dialog to something else. Alternatively, you can decrease the Opacity in the properties dialog on step 7. Repeat steps 6 and 7 until you have something you like.
In addition to the radius, you can experiment with various other adjustments and effects on the two layers. Things to try could be adjusting brightness and contrast, playing with the levels in different color bands and so forth. Remember you can do different things in each layer prior to merging for a wide variety of changes to the original image.
As example, this image is the final one above with additional tweaking of the brightness and contrast on the Out of focus layer and some levels adjustments on the Sharp layer.
(Click image to see a larger size.)
[1] Here are some other, non-Paint.Net references regarding this effect:
http://www.pcin.net/update/index.php/2006/11/01/the-orton-effect-digital-photography-tip-of-the-week
http://macroartinnature.wordpress.com/2006/04/12/using-the-orton-method-for-artistic-blending
http://tutiki.nikoncafe.com/w/index.php/The_Orton_Technique
Someone posted a comment on one of these sites suggesting Paint.Net's Glow effect was equivalent. I'm not sure I agree. It does have some similarities, but in my admittedly limited experimentation, it doesn't give as much control over the final result. For comparison, here's the above original with the Glow effect added.
(Click image to see a larger size.)
Labels:
HowTo,
Orton Effect,
PaintNet,
Photography
![]()
![]()
Thursday, March 8, 2007
How to use the Clone Stamp tool between layers in Paint.Net
This tutorial shows how to use the clone stamp tool in Paint.net to copy portions of one layer to another.
It shows how to change these:


Into this:
To prepare, save the files used in this tutorial by right clicking on these links and selecting 'Save link as':
1. Open 'Hear See Speak 1.jpg'
2. Select Layers | Import from file...

3. And open 'Hear See Speak 2.jpg'. This creates a new layer and puts this image on it.
4. Do another layer import on file 'Hear See Speak 3.jpg'. We now have three layers, each with a different image on it.
5. On the Layers window, uncheck the check box on 'Hear See Speak 2'.

6. Make sure the 'Hear See Speak 3.jpg' layer is selected.

7. On the Tools window, click Rectangle select.

8. Select the portion of the image on the right to copy. I used the rectangle selection tool for ease, but you can use any of the selection tools. Depending on the image, you may want to use a selection tool which gives a closer crop on the source. This step is not mandatory but I recommend it. If you don't do this, you may accidentally clone over part of the destination layer which you don't want to change and have to undo and start cloning over. [1]

9. Next click the Stamp tool.

10. Then Ctrl-click on a section to copy.

11. Set the Brush width to 100.

12. Clear the check box for 'Hear See Speak 3'. You should now see the background with a selection rectangle on the right with a round stamp tool indicator.

13. Align the cursor's brush indicator directly on top of the stamp tool's indicator.

14. Click and drag the cursor. You'll see the image from the other layer get copied to the background. Slowly outline the image on the background layer...

15. ...and then fill in the middle by simply dragging the cursor.

16. Repeat for the 'Hear See Speak 2' layer:
- Click the check box for 'Hear See Speak 2' and then click on the layer to highlight it.
- On the Tools window, click Rectangle select.
- Select the portion of the image in the middle to copy.
- Next click the Stamp tool.
- Then Ctrl-click on a section to copy.
- Clear the check box for 'Hear See Speak 2'. You should now see the background with a selection rectangle in the middle with a round stamp tool indicator.
- Align the cursor's brush indicator directly on top of the stamp tool's indicator.
- Click and drag the cursor to copy the second layer.

18. Done

Hints:
- Put selection rectangles on straight lines in the image to help hide the transition.
- Don't forget to copy shadows and reflections.
- Use a tripod.
- Use Manual exposure and focusing so there's no change in exposure from one image to the next.